Melissa Mayntz, EverythingBirds, sponsored by Droll Yankee

Droll Yankee Hummingbird feeder.
Cleaning a hummingbird feeder properly is essential to ensure safe, nutritious nectar for hungry hummingbirds. Fortunately, it is not difficult to clean a hummingbird feeder. Conscientious birders who keep their nectar feeders clean will soon be enjoying many delightful hummingbird visits.
The Dangers of a Dirty Hummingbird Feeder
More than just being an unsightly, unattractive mess, a dirty hummingbird feeder can cause real problems for you and your hummingbirds. A dirty feeder can be contaminated with mold, fungus, and bacteria. All of these can cause illness or even death to hummingbirds. Furthermore, old nectar, even without toxic contamination, can become a thick slurry or syrup-like texture. It may start to crystalize in the nooks and crannies of the feeder. This can clog feeding ports, making it impossible for hummingbirds to easily feed. It could even warp or crack the feeder.
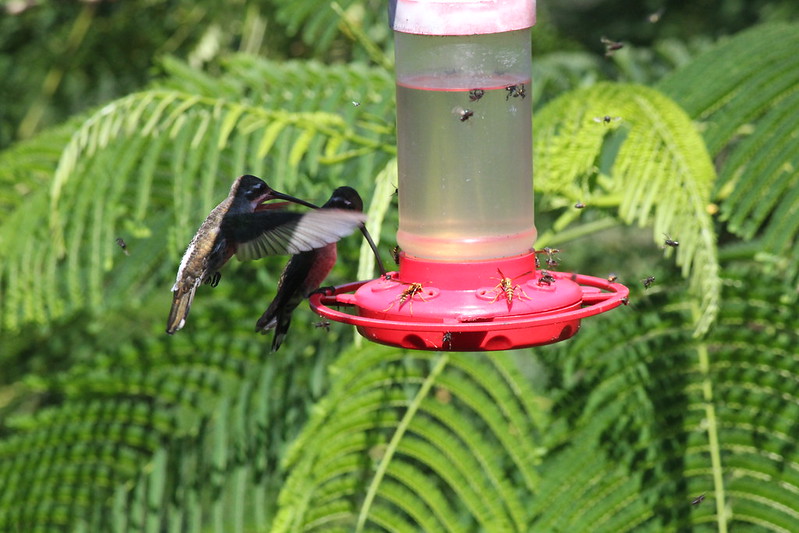
Dirty feeders will also develop strong fermentation or sickly-sweet odors. Those odors will attract greater numbers of unwanted insects, such as ants, wasps, and even praying mantises that can attack hummingbirds. Other unwanted wildlife, such as raccoons, rats, and even bears, will also be attracted to strong feeder smells.
Finally, a dirty, unattractive feeder can cause problems between birders and their neighbors. No one wants to see or smell a filthy feeder. Failing to maintain a clean yard could also be a violation of homeowner’s association guidelines or other community ordinances. This can result in fines or other penalties, including strong restrictions on feeding any birds.
Identifying a Dirty Feeder
A dirty hummingbird feeder is easy to see. Spoiled nectar will become cloudy or filmy, and may show black specks, milky strings, or other intrusions into its otherwise clear texture. Visible black, white, or green mold may form inside the feeder or could be seen around feeding ports, particularly if the feeder is prone to leaks or drips. Dead insects could be in the ant moat or even inside the feeder, or a strong odor could linger around the feeder. Slightly jiggling the feeder could show whether the nectar has become syrupy or too dense for hummingbirds to easily feed.

Easy Steps to Thoroughly Clean a Hummingbird Feeder
No matter how dirty a hummingbird feeder may be, cleaning it is easy. Ideally, you should clean your hummingbird feeders thoroughly each time they are refilled to minimize any contamination in the nectar. To safely clean a hummingbird feeder…
1. Disassemble
Disassemble the feeder completely, removing bee guards, ant moats, and other accessories. This will allow the entire feeder to be properly cleaned, even in the tiniest nooks and crannies where mold and bacteria can linger.
2. Soak
Soak the feeder in hot water to loosen and dissolve any crystallized sugar. You can use any cleaning solution you like, including a weak bleach solution, a weak vinegar solution, or a mild dishwashing soap. If the feeder is not too dirty, just plain water will suffice.
3. Scrub
Scrub all feeder parts feeder thoroughly, using old toothbrushes, bottle brushes, and feeding port brushes or pipe cleaners as necessary to get into small crevices or to clean out narrow feeding tubes. Also clean perches, hooks, and hangers where hummingbirds may visit.
4. Rinse
Rinse the feeder thoroughly with fresh, clean, plain water. Be sure the rinse all feeding ports, checking that they are flowing freely. Rinse out all small cracks, corners, seams, and crevices so there is no soap or cleaning solution remaining.
5. Dry
Allow the feeder to air dry, preferably in bright sunlight that will help break down any remaining soaps and neutralize any last particles of mold or fungus. Ideally, the feeder should be completely dry before refilling, but some small remaining moisture is fine.
6. Reassemble
Reassemble the feeder carefully, ensuring all parts fit tightly as designed. Refill the feeder with fresh nectar, taking care not to overfill it, and hang it back in its original position so hummingbirds can quickly find the feeder for their next meal.
Cleaning a hummingbird feeder only takes a few minutes, but it can do a world of good to protect hummingbirds from dangerous contaminants. In the hottest weather, clean your hummingbird feeders every 2-3 days. In cooler locations, cleaning hummingbird feeders every 4-5 days can be adequate, so long as there are no other signs of a dirty feeder.
Can I Clean a Hummingbird Feeder in the Dishwasher?
Most hummingbird feeders have glass or plastic parts, so why not put them in the dishwasher for even more convenient cleaning? This may seem like a simple solution, but hummingbird feeders are not typically constructed from the same grades of plastic as dishwasher-safe dishes. Putting a hummingbird feeder in the dishwasher can warp or crack the feeder, making it unsafe to use or causing dramatic leaks and other problems. Small parts of a feeder can also be lost or damaged in a dishwasher, and may even cause clogs that can damage the appliance. Always check the manufacturer’s cleaning guidelines for your hummingbird feeder. Unless it specifically indicates that the feeder is dishwasher safe, hand cleaning is the best option.
Cleaning hummingbird feeders properly is critical to provide these charming birds with fresh, safe nectar. A regular cleaning regimen will make your feeders and yard even more hummingbird-friendly.